Qt®4 Tutorial for the Ruby
Programming Language
Chapter 10: Smooth as Silk
Files:
Overview
In this example, we add a force control.
Line by Line Walkthrough
cannon.rb
The CannonField now has a force value in addition to the angle.
  signals 'angleChanged(int)', 'forceChanged(int)'
  slots 'setAngle(int)', 'setForce(int)'
The interface to the force follows the same practice as for the angle.
  def initialize(parent = nil)
    super()

    @currentAngle = 45
    @currentForce = 0

    setPalette(Qt::Palette.new(Qt::Color.new(250, 250, 200)))
    setAutoFillBackground(true)
  end
The force @currentForce is initialized to zero.
  def setAngle(angle)
    if angle < 5
      angle = 5
    elsif angle > 70
      angle = 70
    end

    if @currentAngle == angle
      return
    end

    @currentAngle = angle
    update(cannonRect())
    emit angleChanged(@currentAngle)
  end
We have made a slight change in the setAngle() function.
It repaints only the portion of the widget that contains the cannon.
  def setForce(force)
    if force < 0
      force = 0
    end
    if @currentForce == force
      return
    end

    @currentForce = force
    emit forceChanged(@currentForce)
  end
The implementation of setForce() is quite similar to that of setAngle().
The only difference is that because we don't show the force value, we don't need to repaint the widget.
  def paintEvent(event)
    painter = Qt::Painter.new(self)

    painter.setPen(Qt::NoPen)
    painter.setBrush(Qt::Brush.new(Qt::blue))

    painter.translate(0, height())
    painter.drawPie(Qt::Rect.new(-35, -35, 70, 70), 0, 90 * 16)
    painter.rotate(-@currentAngle)
    painter.drawRect(Qt::Rect.new(30, -5, 20, 10))
    painter.end()
  end
We paint as in Chapter 9.
  def cannonRect()
    result = Qt::Rect.new(0, 0, 50, 50)
    result.moveBottomLeft(rect().bottomLeft())
    return result
  end
The cannonRect() function returns the rectangle enclosing the cannon in widget coordinates.
First we create a rectangle with the size 50 x 50 and then move it so its bottom-left corner is equal to the widget's own bottom-left corner.
The Qt::Widget::rect() function returns the widget's enclosing rectangle in the widget's own coordinates. The top-left corner of the rectangle is always (0, 0).
t10.rb
The constructor is mostly the same, but some new bits have been added.
    force = LCDRange.new()
    force.setRange(10, 50)
We add a second LCDRange, which will be used to set the force.
    connect(force, SIGNAL('valueChanged(int)'),
             cannonField, SLOT('setForce(int)'))
    connect(cannonField, SIGNAL('forceChanged(int)'),
             force, SLOT('setValue(int)'))
We connect the force widget and the cannonField widget,
just like we did for the angle widget.
    leftLayout = Qt::VBoxLayout.new()
    leftLayout.addWidget(angle)
    leftLayout.addWidget(force)

    gridLayout = Qt::GridLayout.new()
    gridLayout.addWidget(quit, 0, 0)
    gridLayout.addLayout(leftLayout, 1, 0)
    gridLayout.addWidget(cannonField, 1, 1, 2, 1)
    gridLayout.setColumnStretch(1, 10)
In Chapter 9, we put angle in the lower-left cell of the layout.
Now we want to have two widgets in that cell, so we make a vertical box,
put the vertical box in the grid cell, and put each of angle
and range in the vertical box.
force.setValue(25)
We initialize the force value to 25.
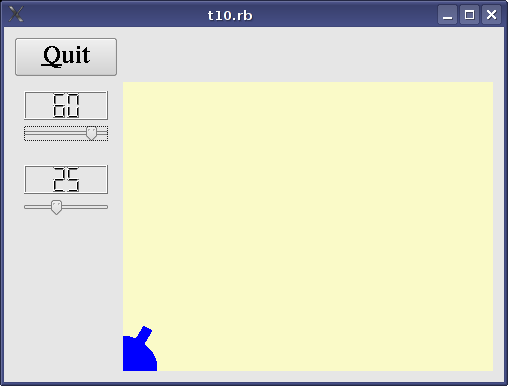
Running the Application
We now have a force control.
Exercises
Make the size of the cannon barrel be dependent on the force.
Put the cannon in the bottom-right corner.
Try adding a better keyboard interface.
For example, make + and - increase and decrease the force and enter shoot.
If you're bothered by the way the Left and Right keys work, change that too.
[Hint: Reimplement Qt::Widget::keyPressEvent().]